If you are setting up your rainwater harvesting system to be able to pump it back into the house for drinking water then you will need a good filtration system. This does however bring up a few questions. Can you drink rainwater to begin with? If you can, why do you need to filter it? In this article I have a look at some of the options available and answer these and other questions.
Can you drink rainwater?
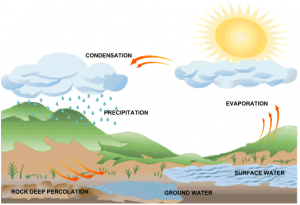
 We often think of rainwater as waste, but the opposite is actually true. You may remember from school how rain is formed, and hopefully I have remembered this correctly, it was a very long time ago. The sun evaporates water from the ground which becomes steam and rises up into the sky where it collects and forms clouds. Those clouds get over saturated and this causes rain to form. So essentially rain is distilled, purified water as it falls directly from the sky.
Even as rainwater falls directly onto the ground and gets soaked up, it forms mineral water and is relatively safe to drink. So why do we need to filter it?
Unfortunately as rain falls onto such things as the roof or brick paving, it picks up contaminates that make it unsafe for drinking. Nowadays we also have more air pollutants so we can’t be sure what it is picking up even as it falls to the earth.
So, if we can collect the rainwater directly from the sky before it comes into contact with anything that could contaminate it, such as the use of a rain saucer, it would be good for drinking (still have to question the air pollutants though). If you are collecting large quantities of rainwater from your entire property however, it would have most likely run over an area with nasties such as leaves and bird poop.
How to filter rainwater from roof
 There are a few processes that filtering can and should take, even if you are not intending on converting your rainwater into drinking water.
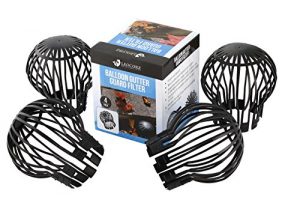
First is making sure that larger objects such as leaves stay out of the water collection tank and this is done by using mesh filters. These filters can be placed along your gutters, there are a lot of different products and companies out there that make these and a few different options.
We have a mesh gutter guard that runs right along the gutter but someone also came up with a foam gutter guard that sits inside your gutter and filters out a bit more than just leaves. Unfortunately the foam guard is said to only be a short term option because after a year or two it will most probably shrink or crumble and needs to be replaced. Although a cheaper option, the fact that you need to replace it so often doesn’t really make it worthwhile.
We also have filters that trap leaves before they enter the downpipe, such as the classic dome filter. The list just keeps going on and on though. Some filters can be placed halfway down the downpipe if you have a rain barrel next to the downpipe. You can also place filters in the piping just before it enters your collection tank or sump. The options are quite endless. There’s even one that looks like a bristle brush.
 However, that’s not where your filtration ends if you want to pump it back into the house. The above is your pre-tank filtration, now you need to look at your post-tank filtration to make it into drinking water. Leaves are not your only beastie, there are far worse such as bird poop that will dissolve into the rainwater.
So we have filtering systems to remove the debris, then we need to disinfect and purify the water. Filters are measured in microns and the first filter should be one that removes sand and other such larger particles and is a 50 micron filter. This filter needs to be accessible so that it can be cleaned often.
Next is a 10 to 20 micron filter followed by a 5 to 10 micron filter which should be cleaned at least once a year. After that the water needs to be disinfected in order for it to be drinkable.
You can buy a filtration system at most places that deal with rainwater harvesting and filtration systems specifically, and I am sure I will cover some of these more indepth in future articles, but how about we look at a homemade system. Why? Because I love making things.
Homemade DIY rainwater filtration system
An easy and cost effective method is to make your own Berkey water filter. From what I understand this is also a purification system so you can in fact drink your water after this.
Instead of buying the full Berkey system which would cost you around $300, you can get just the ceramic replacement filters for $66, two in a pack. It seems there have been some issues with the standard filters so have a look for the ceramic ones. Here’s a quick video demonstrating how to make your own Berkey water purification system.
The Berkey system however is for small amounts of water. In this scenario you would take a bucket of water from your rainwater collection tank and pour it in, filter it and that’s it until you empty it and then go get another bucket of water.
So what do you do if you want a filtration system on a larger scale? We go back to ancient Egypt where they were using carbon for water purification centuries ago. Carbon is now used in home based water treatment systems such as your water filter jug.
The system is quite simple. You filter the water through a series of sand, pulverised charcoal and the gravel. Charcoal consists of elemental carbon in its graphite configuration.
I strongly encourage you to go and read the article by Josh Kearns who has done extensive research into this. You’ll find his article here.
In his article he states that “Carbon filters are effective for removing chlorine, mercury, iodine, and some inorganic compounds as well as many problematic organic contaminants such as hydrogen sulphide (H2S), formaldehyde (HCOH), and volatile organic compounds (VOCs). Activated carbon does not bind well to certain chemicals including lithium, alcohols, glycols, ammonia, strong acids and bases, metals, and most inorganic substances such as sodium, lead, iron, arsenic, nitrates and fluoride. As a general rule, carbon will bind non-polar materials while polar materials will tend to remain in aqueous solution. Most pesticides are organic and strongly non-polar and thus should display an affinity for adsorption onto the carbon surface.”
He also goes into how to make charcoal yourself if you really want to do a proper DIY project, from how to build the kiln to the finished charcoal. He also suggests running the water under a germicidal UV lamp just to get rid of any contaminants that might make it through, but we will look at water treatment methods below. You can also download his PDF doc.

The above system works with a layer of sand, followed by charcoal and then gravel. You will find that other systems reverse the charcoal and gravel so that the sand and gravel trap any elements that should not be in the water and the charcoal filters it and removes the last of the contaminants.
But how does it all work? Sand and gravel, arranged by particle size, will trap and remove any larger particles such as bugs, algae, suspended dirt and “floc”. Some nasties such as a bacteria and arsenic make it through this process however, which is where charcoal comes in. This system does need to be backwashed regularly to keep it clean, much like your pool.
We have already mentioned the amazing qualities of charcoal and what it removes from the water. The process works through absorption whereby the organic particles stick to the carbon granules.
How to treat rainwater for drinking
After your filtration process you will want to treat it or purify it to make sure that all bacteria and harmful chemicals have been removed. Below I discuss some of these options.
UV Treatment
This is one of the more expensive methods, however it is the most effective. The filtering will remove most of the particulates but then it should be treated in a UV light chamber.
Because UV treatment doesn’t add any chemicals it means that the water remains taste and odour free. It does require a power supply but it takes very little energy and doesn’t require a lot of maintenance. Although the UV light doesn’t take a lot of energy, you have to remember that it is on all day every day all year round, so in the long run it can get quite costly to keep running.
Chlorine and iodine
A much more cost effective method is to treat it with chlorine, which is what most towns and cities do. You do get different types of chlorine and the quantities vary as to whether you use liquid chlorine or dry chlorine pellets.
The general rule of thumb is to use 4 to 6 drops of liquid chlorine to 1 quart of water and leave it for 30 minutes, or an hour if the water is near freezing.
If you are using dry chlorine pellets and have more that 12 hours to wait for the purification then bring the level to between 5 and 10 ppm. If you don’t have 12 hours to wait then bring it to 50 to 100 ppm and wait 2 to 6 hours.
There is a great guide on how much chlorine to add compared to the quantity of water you have at the Clean Water Store site.
Iodine is very similar to chlorine and you can use it in much the same manner and quantity, however be careful because some people are allergic to iodine.
It works best if the water is over 21 degrees celsius (68F) and you also get different types. The liquid 2% tincture of iodine is probably to best to use. Add 5 drops per quart if the water is clear and 10 drops if the water is cloudy.
Solar pasteurization
 On a small scale this is done by filling a clear bag with water and placing it on aluminium foil and then building up walls with more foil so that the solar reflection is at its maximum. Leave that in full sun for a few hours and it will kill any bacteria.
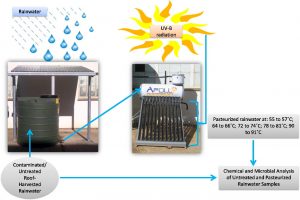
However on a large scale this can be done by running the water through a series of pipes that is exposed to the direct sun allowing it to heat up enough to kill off any of the beasties that you don’t want in your drinking water.
It has been found that heating the water to 72 degrees celsius or above will kill of any unwanted things.
Boiling the water
Which brings us to boiling. Quite straight forward, and something we all know. Boiling water for 10 to 15 minutes will kill off the bacteria. In terms of rainwater collection in large quantities you could pump the water into a geyser where it can boil and then be stored into tanks for later use.


 I currently live in South Africa and we have recently started putting a rainwater harvesting system into our garden. I find the topic amazing and have done a lot of research with more to follow on different systems and even DIY options. I hope to share them all here.

